
v 1.0.0 03JUL26
SHICANE HLR
EMOTO / SURRON ULTRA BEE
USER MANUAL
USER MANUAL


THANK YOU FOR CHOOSING RACINGBROS!
For safety and performance, follow this manual during installation and setup. Regular servicing by authorized centers is recommended.
PREPARATION
Remove the seat and side panels, and take off the stock shock absorber along with the linkage.
Tools required for Shicane HLR for ULTRA BEE installation:
- Torque wrench, sockets (14 mm) and hex keys (3 mm, 6 mm, 8 mm)
- Open wrench (12 mm)
- Blue threadlocker (e.g., Loctite 243)
- Torque wrench(es) 5-60 Nm
Tools required for Shicane HLR for ULTRA BEE installation:
- Torque wrench, sockets (14 mm) and hex keys (3 mm, 6 mm, 8 mm)
- Open wrench (12 mm)
- Blue threadlocker (e.g., Loctite 243)
- Torque wrench(es) 5-60 Nm

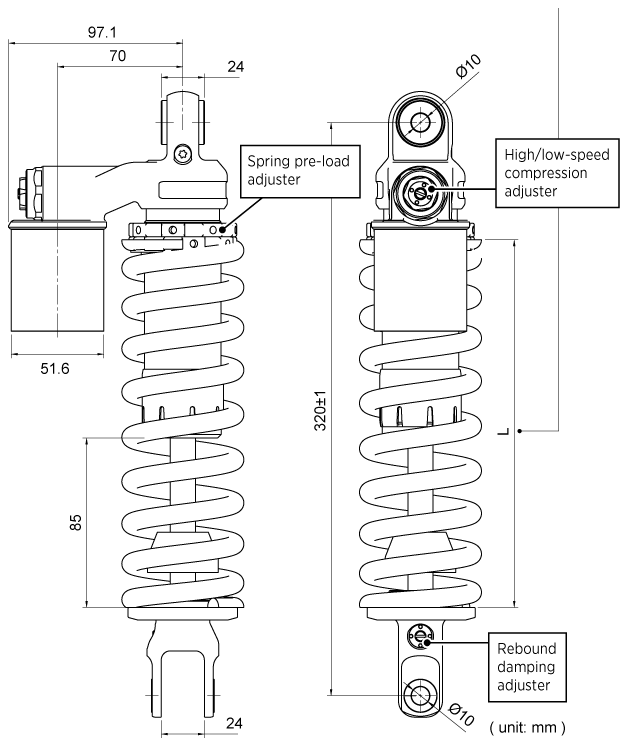
SHOCK SPRING GUIDE
| Product number | Spring number | Rider weight | Spring rate | Spring free length | Spring preload length (L) |
|---|---|---|---|---|---|
| R0800229-1 | R3050173 | 121–165 lb (55–75 kg) | 80 N/mm (457 lb/in) | 205 mm | 198 mm |
| R0800229-2 | R3050208 | 154–198 lb (70–90 kg) | 87.5 N/mm (500 lb/in) | 200 mm | 193 mm |
| R0800229-3 | R3050209 | 187–231 lb (85–105 kg) | 96.3 N/mm (550 lb/in) | 200 mm | 193 mm |
| R0800229-4 | R3050223 | 220–265 lb (100–120 kg) | 105 N/mm (600 lb/in) | 200 mm | 193 mm |
* Rider weight: Total rider weight including all riding gear and protective equipment.
INSTALLATION
STEP 1
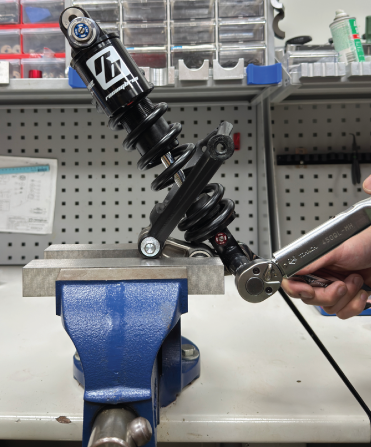
Apply threadlocker, secure the shock absorber clevis to the linkage, and torque to 58.84 Nm (600 kg-cm).
STEP 2
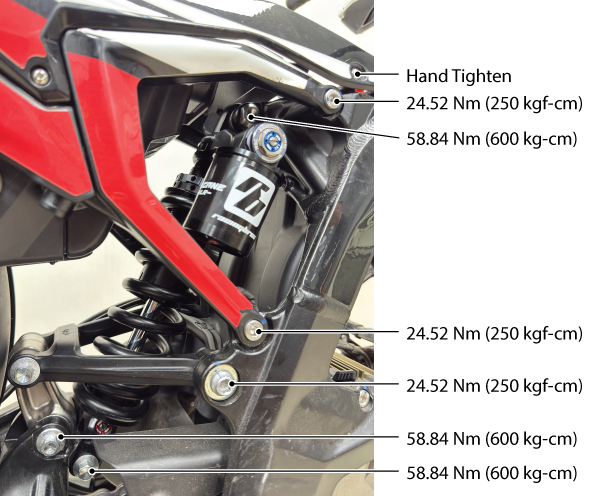
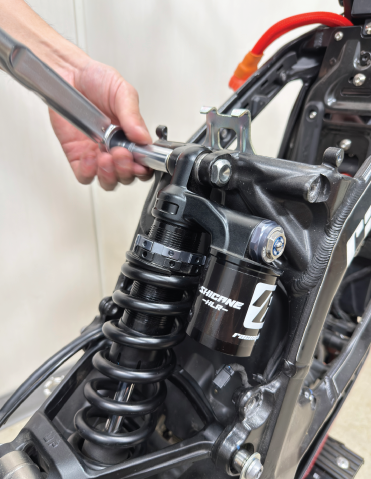
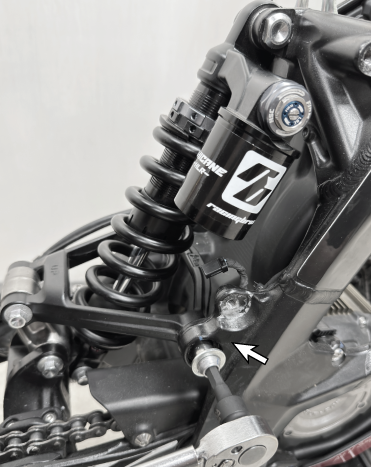
Reinstall the SHICANE HLR and linkage in the reverse order of removal. Torque the upper shock mount bolt to 58.84 Nm (600 kg-cm).
STEP 3
Torque the linkage bolts to OEM specs.
STEP 4
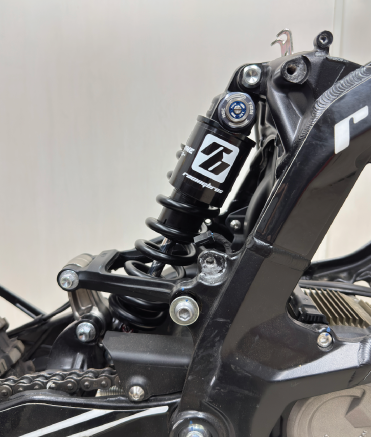
Once the shock and linkage are secured, reinstall the seat and side panels.
TUNING
PRE-LOAD
Suspension pre-load adjustment is vital, affecting bike height and front fork angle. Rider weight compresses shock absorbers, causing sag.
Measure bike height fully extended (A) and compressed with rider (B).
50 mm is recommended.
Measure bike height fully extended (A) and compressed with rider (B).
50 mm is recommended.

To measure SAG, first unload the bike and slide the RACINGBROS O-ring to the bottom of the fork. Have someone hold the bike upright while you sit on it in a natural riding position. After dismounting, measure how far the O-ring has moved upward—this is your static sag. The typical range is 40–60 mm, depending on rider weight and gear. For off-road riding, we generally recommend setting the sag to between 25% and 35% of the total suspension travel. For greater accuracy, we recommend using a tool such as the Motool Slacker.
⚠ Do not exceed a SAG of 70 mm. Insufficient preload may result in bottoming out and potential damage to the suspension.
REBOUND DAMPING
Controls the speed at which the suspension returns after compression. Adjustment should consider rider weight, riding style, and terrain.
The faster the rebound without causing instability, the better. Adjustment range: 24 clicks (±3 clicks).
The faster the rebound without causing instability, the better. Adjustment range: 24 clicks (±3 clicks).


When it's bumpy, turn the rebound counterclockwise for a quicker response.

When it's unstable, loose, or bouncy, tighten rebound clockwise for a slower response.
COMPRESSION DAMPING
Controls how quickly the suspension compresses under load. Affects front-end dive under braking, wheel traction, and ride quality.
Proper compression settings provide optimal traction and handling performance. Adjustment range: 24 clicks (±3 clicks).
Proper compression settings provide optimal traction and handling performance. Adjustment range: 24 clicks (±3 clicks).


When it's bumpy, rough, or harsh, turn the compression counterclockwise.

When it's unstable, loose, or bouncy, tighten compression clockwise.
Fine-tuning compression damping based on road conditions and riding style allows for the most comfortable and optimal setup. As your sensitivity to suspension behavior improves, try making more precise adjustments.
⚠ This product contains high-pressure nitrogen. Do not disassemble or tamper with the unit. Improper handling may result in explosion, causing serious injury or death.
⚠ Do not over-preload the spring. Verify that the preload length exceeds 190 mm.

!
WARNING
Modifying suspension settings can significantly alter handling characteristics and may overload components if changes are extreme.
· Only make adjustments within the recommended range.
· After adjustments, ride slowly at first to get accustomed to the new handling.
Failure to comply with the manual may result in product failure, damage, property loss, or personal injury. Damage caused by tampering with or modifying chassis components is not covered by the warranty.
· Only make adjustments within the recommended range.
· After adjustments, ride slowly at first to get accustomed to the new handling.
Failure to comply with the manual may result in product failure, damage, property loss, or personal injury. Damage caused by tampering with or modifying chassis components is not covered by the warranty.
INTENDED USE
This RACINGBROS suspension component is specifically designed for use in closed-course racing environments with approved vehicles. Any misuse, including the use of non-specified fluids or improper applications, will compromise safety and performance.
MAINTENANCE AND WARRANTY
To maintain warranty coverage and ensure optimal performance, all service work must be carried out at a RACINGBROS Authorized Center, using only RACINGBROS-approved parts and accessories. The use of non-approved parts will void the warranty.
INSTALLATION AND TORQUE
The suspension component must be installed according to the vehicle manufacturer's specifications. It is recommended that installation be performed by a RACINGBROS Authorized Center, adhering to the correct torque settings.
ENVIRONMENTAL RESPONSIBILITY
All used fluids, lubricants, and components must be disposed of responsibly, in accordance with local environmental regulations.
CUSTOMER ASSISTANCE
For any questions or support regarding your RACINGBROS suspension, please contact a RACINGBROS Authorized Center or visit the RACINGBROS website: www.racingbros.com

